|
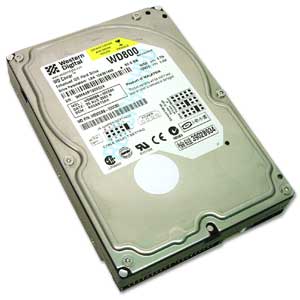
Hard drive profile
 |
||||||||
| Date added: | 2004-06-27 | Posted by: | Fiskbrain | |||||
| Brand: | Western Digital | Firmware: | N/A | |||||
| Model number: | WD800BB | Manufacture date: | 2001-05-28 | |||||
| Model name / serie: | WS Caviar | Buffersize: | 2 MB | |||||
| Drive size: | 80 GB | RPM: | 7200 | |||||
| PS2 version: | v9 | Progam(s): | HD loader PS2Ownz and HDD explorer | |||||
| Adaptor model: | Ethernet Only | |||||||
|
||||||||
| Additional notes: | Report this entry - Edit | |||||||
| First of all the drive doesn't fit but since some people have written how theyre WD disk's work on a modded eth adapter. I modded my adaptor to but to my dissapointment Hd loader didnt detect it | ||||||||
Comments
| #1 - posted by Your mama (200.117.14*.*) | 2004-07-28 20:03:48 |
| Jump it to Cable Select YOU MORON! | |
| #2 - posted by (24.211.3*.*) | 2005-02-17 05:51:01 |
| I just bought this drive and it works fine....just like all Western Digital Drives it just takes a little more effort thats all. Since I have very little technical experience, I will do my best to explain this in dummy like terms for those who have about my level of expertiese. ***Make sure you have the hard drive on cable select (mine was set that way out of the box). If you dont know what that means look at the top sticker on the hard drive and look at the diagram and make sure it is set to that.*** 1. You will have to modify the network adapter a bit. Unscrew the bottom two screws so it allows you to bend the bottom tin protective peice (heat shield) back so the bottom connections are exposed. It will be neccessary to snip away of the tin that covers the two bottom connectors to make the modification possible. Use some tin snips or some real sharp scissors like I did. 2. Remove the two screws that connect the power connector to the rest of the netowrk adapter (4 holed jobbie to your left if you are looking at it). 3. When it is unscrewed you will be able to spread the power connector more to the left which will give you just enough room to plug the hard drive into the network adapter. 4. Once you know it fits, disconnect the hard drive from the network adapter and bend the tin that you bent back in the beggining back down if you want or just snip away all of the tin up to the IDE plug-in (the connector that is screwed down higher up on the network adapter) if you wish. 5. Reconnect the hard drive to the network adapter. Slide the hard drive in and screw the network adapter onto the back of the playstation. That's about it. If I had to do it again it would take me 15 minutes, but took me about 45 minutes the first time as I kinda stumbled my way through it. I hope this helps those that need it. Contact me with questions. ***I own HD Advance 2.0 and this works with this hard drive just fine, recognized it and formatted it in about 30 seconds.*** |
|
| #3 - posted by (213.249.15*.*) | 2005-03-10 11:43:27 |
| fuck you !! | |
| #4 - posted by lamer (218.111.6*.*) | 2005-05-23 12:07:20 |
| Not working? no worry. Take ur HDD.. drop on the floor. At least 3 times. I bet it work perfect in your PS2. Lol. |
|
| #5 - posted by Paul (211.28.8*.*) | 2005-08-06 10:40:07 |
| Hang on those that are not working (hardware error Message) Its prob cause of different version jumper settings. Mine only showed master slave and cable select... To get it to work straight away... take the jumper out... that is the default way it should be ... only it doesnt show it on the sticker on top with all revisions.... Took me a while before i tried it... It detected perfectly after this.... Oh and yeah you will need to push the clearences to the max to fit the drive to the adaptor..... But it works perfectly after that.... |
|
| #6 - posted by Korn (201.58.16*.*) | 2007-03-27 19:21:21 |
| Good, i'll try here. Maybe it really works. Thx. |
|
| #7 - posted by (103.246.20*.*) | 2014-07-11 05:25:40 |
| I download hd loader | |
